
Supply Closet Setup: A Simple Layout That Speeds Up Service
Why this matters for Fort Worth businesses
Every extra minute a cleaner spends hunting liners or swapping mop buckets is a minute not spent on visible results. Organized supply closets reduce labor time, shrink chemical waste, and standardize outcomes across shifts and sites. In high-traffic offices, gyms, medical suites, and retail around DFW, a tight closet layout keeps teams moving and complaints down.
Common pitfalls (and what to watch for)
- “Catch-all” closets: Random boxes, old tools, and personal items crowd shelves, causing delays and safety issues.
- No par levels: You run out of liners or neutral cleaner mid-shift, or overstock and tie up cash.
- Leaky/unclear dilution: Guesswork mixing drives residue, streaks, and cost.
- Trip/slip hazards: Hoses on floors, wet heads left in the corner, unventilated chemical storage.
- No visual standards: New or floating staff can’t find anything, so they improvise.
Step-by-step process / checklist
1) Clear, clean, and measure (Day 1)
- Remove everything; discard expired chemicals, broken tools, and non-janitorial items.
- Sweep/mop floors; sanitize shelves and door handles.
- Measure the space (length × width × shelf depth). Sketch a quick floor plan.
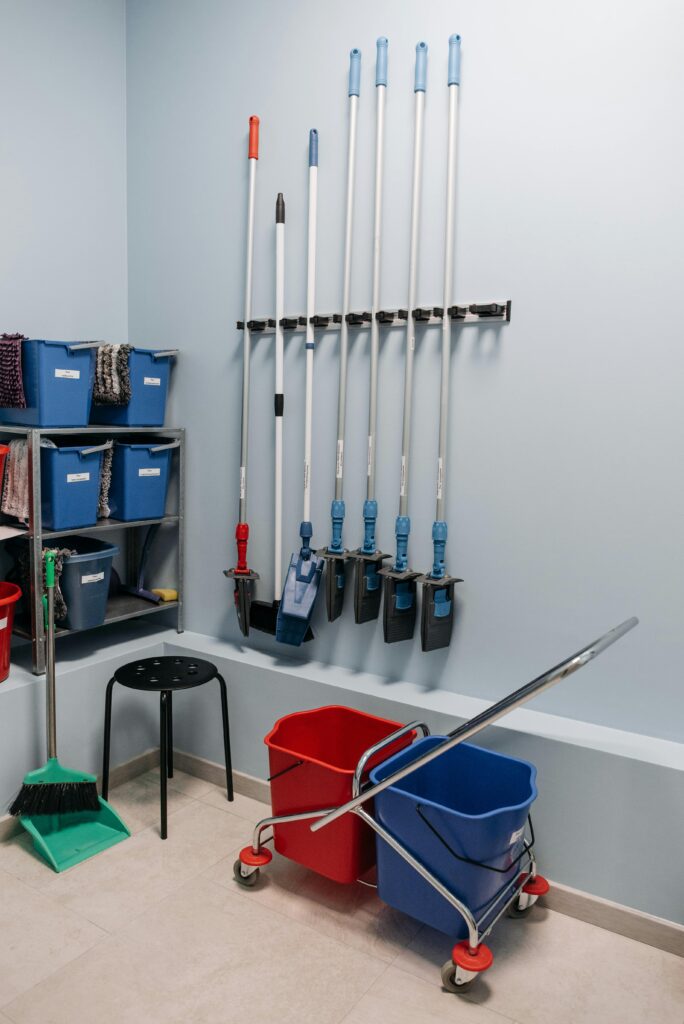
2) Assign zones
Create five clear zones to speed retrieval and prevent cross-contamination:
- Chemicals & Dilution (upper shelf + wall station)
- Consumables (liners, paper, soap, towels)
- Tools & Equipment (vacuums, mop handles, sprayers)
- Microfiber & Mops (clean vs. soiled, color-coded)
- PPE & SDS (eye protection, gloves, masks; printed SDS binder)
3) Install the essentials
- Lockable chemical cabinet or top shelves with door hasp.
- Dilution control (closed-loop or proportioner) with a drip tray under concentrate jugs.
- Two labeled bins: “Clean Cloths/Mops” and “Used—To Laundry.”
- Vertical tool rack: holds 5–8 handles; keeps floors clear for safety.
- Mat or drip pan for wet mop buckets/auto-scrubber.
- Battery/charger shelf for cordless gear (label each charger and battery).
- Good lighting & ventilation; install motion lights if possible.

4) Label and color-code
- Colors: Red = restrooms, Blue = glass/general office, Yellow = food/breakroom, Green = disinfecting as specified.
- Shelf labels: Large, plain text at eye level (e.g., “LINERS—13 GAL | 40–45 GAL”).
- Bottle labels: Product name, dilution, dwell time, and intended zone.
5) Set par levels (never guess again)
Define min/max stock for a 2–4 week window (site dependent). Example:
| Item | Par (Min–Max) |
Notes |
| Neutral cleaner concentrate | 1–2 jugs | With dilution station |
| Disinfectant concentrate | 1–2 jugs | Label dwell time |
| 13-gal liners | 1–3 cases | Desks/offices |
| 40–45-gal liners | 1–2 cases | Breakrooms/restrooms |
| Microfiber cloths (per color) | 40–80 | Based on nightly usage |
| Flat mop pads (per color) | 15–30 | Rotate; launder schedule |
| Paper towels | 2–4 cases | Dispenser model noted |
| Toilet tissue | 2–4 cases | Core size noted |
| Hand soap | 2–3 cases | Cartridge SKU visible |
| PPE (gloves/masks) | 2–4 boxes | Right sizes on label |
Post the table on the inside door and in the site binder.
6) Create a 1-minute open/close routine
Open (start of shift):
- Check pars (quick glance); top up carts.
- Confirm batteries are on charge; swap if needed.
- Mix/dispense ready-to-use bottles via dilution station.
Close (end of shift):
- Return tools to marked spots.
- Count down to min par; leave a reorder note if needed.
- Place used cloths/mops in the “To Laundry” bin; crack the door for ventilation.
Tools, products, and equipment to use
- Dilution control system: Prevents overuse, ensures repeatable results, and protects finishes.
- HEPA backpack vacuum with spare bags; quiet for after-hours sites.
- Flat mop system (Velcro pads) per color; faster than string mops and less water on floors.
- Microfiber cloth sets (red/blue/yellow/green) with a launder-only policy—no sink rinsing back into use.
- Neutral pH floor cleaner for daily use; finish/restore kit for VCT or polish-maintained LVT.
- Restroom kit (acid cleaner, descaler, and grout brushes) stored separately from office kits.
- Spray bottles with chemical-resistant triggers and secondary labels printed and taped.
- PPE (gloves, glasses) and SDS binder within reach—not buried.
Recommended frequency and scheduling
- Daily: Reset tools, top up consumables, charge batteries, empty drip trays, and check spill kit.
- Weekly: Quick shelf wipe-down, sweep/mop closet floor, launder all back-stock microfiber.
- Monthly: Inventory audit vs. par; inspect dilution tips, replace worn pads/brushes, test vacuum bags/filters.
- Quarterly: Deep clean the closet (high-dust, wall wipe-down), re-tape floor outlines, review SKUs, and substitute any discontinued items.
Quality control and documentation
- Photo standard: Post a laminated “Closet Should Look Like This” photo on the door.
- Checklist: 10-point weekly closet inspection (date, initials, pass/fail).
- Inventory log: Simple sheet with beginning count, used, received, ending count; compare to par.
- Issue log: Low stock, broken tools, spills—assigned owner and due date.
- Compliance packet: COI, background checks, chemical list, and SDS available on request in the site binder.
Add-on services to consider
- Dispenser program: Standardize paper/soap/liners to reduce waste and mismatches.
- Matting program: Entry, breakroom, and restroom mats to capture soil and cut slip risk.
- Quarterly floor care (VCT recoat, LVT polish maintenance, carpet extraction).
- Supplier consolidation to lock pricing and simplify reorders.
Ready to speed up service and cut waste?
We’ll design and label your closet, set par levels, and train your team in one visit—so every shift starts fast and finishes clean.
Call 800-748-6858 to request a walkthrough.
